Create Environments
Prerequisites
Before creating an environment, ensure the following are in place:
- An active Kubernetes cluster is available.
- A project has been created with the required services defined.
Environment variables can be added or edited during environment creation — you do not need to set them up in advance.
Step 1 — Environment Basic Details
- Navigate to Environments from the left menu.
- Click Add Environment in the top right corner.
- Fill in the basic details:
| Field | Description |
|---|---|
| Project | Select the application blueprint (project) to deploy. |
| Environment Name | A unique name for the environment. Must be lowercase, alphanumeric, and may contain hyphens. |
| Cluster | The Kubernetes cluster where the environment will be deployed. |
| Namespace | The Kubernetes namespace for the environment. Must be unique per cluster. |
| DNS Zone | The DNS hosted zone used for SSL/TLS certificates and custom domains (Route53 or Cloudflare). |
| Description | Optional description for the environment. |
| Labels | Optional key-value pairs for categorization and guardrail policy matching. |

- Click Save and Next to proceed to the services configuration page.
The services available for configuration are populated from the project you selected.
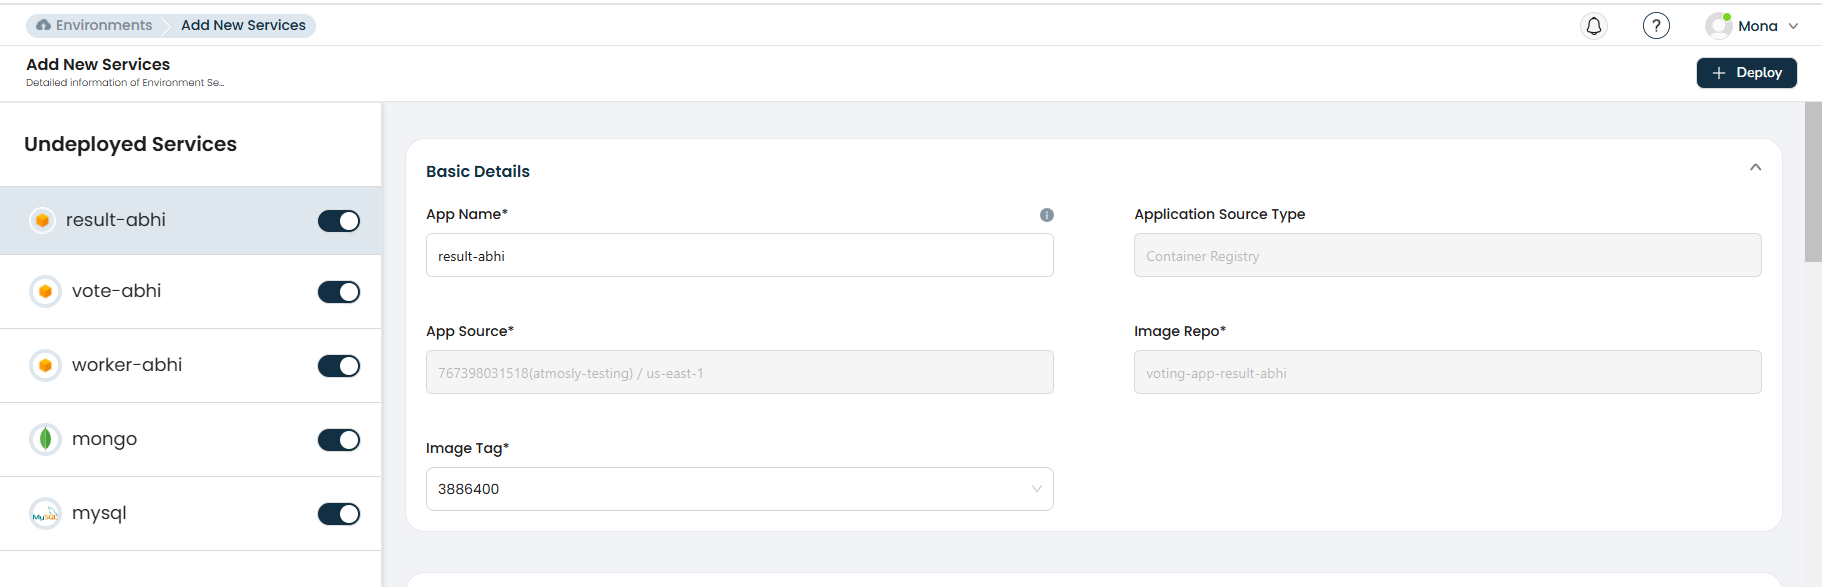
Step 2 — Application Service Configuration
For each application service in your project, configure the following sections.
Source Configuration
Atmosly supports two source types for application services:
Git Repositories (CI/CD)
Build and deploy from source code. Atmosly will run the CI pipeline to build a Docker image and then deploy it.
| Field | Description |
|---|---|
| App Name | Unique name for the service within this environment. |
| App Source | The source code repository (pre-populated from the project). |
| Branch | The Git branch to build from. |
| Dockerfile Path | Path to the Dockerfile in the repository (default: Dockerfile). |
| Build Context | The build context directory for Docker. |
| Architecture Type | The CPU architecture the image is built and run for — AMD (amd64, x86) or ARM (arm64, AWS Graviton). Choose ARM to run on Graviton-based nodes for better price-to-performance; ensure the target cluster has nodes of that architecture. |
| Container Registry | Where to push the built image (ECR, DockerHub, GCR, or GAR). |
| Enable CI/CD | Toggle to enable automatic builds and deployments on code push. |
Container Registry (CD Only)
Deploy a pre-built container image directly — no CI pipeline needed.
| Field | Description |
|---|---|
| App Name | Unique name for the service within this environment. |
| Container Registry | Select from your connected registries (ECR, DockerHub, GCR, or GAR). |
| Image Repository | The container image name. |
| Image Tag | The specific image tag to deploy. |
| Architecture Type | The CPU architecture the image runs on — AMD (amd64) or ARM (arm64, Graviton). Must match the architecture the image was built for and the node architecture in the target cluster. |
Use Container Registry source when your images are built externally (e.g., by a third-party CI system) and you only need Atmosly to handle the deployment.
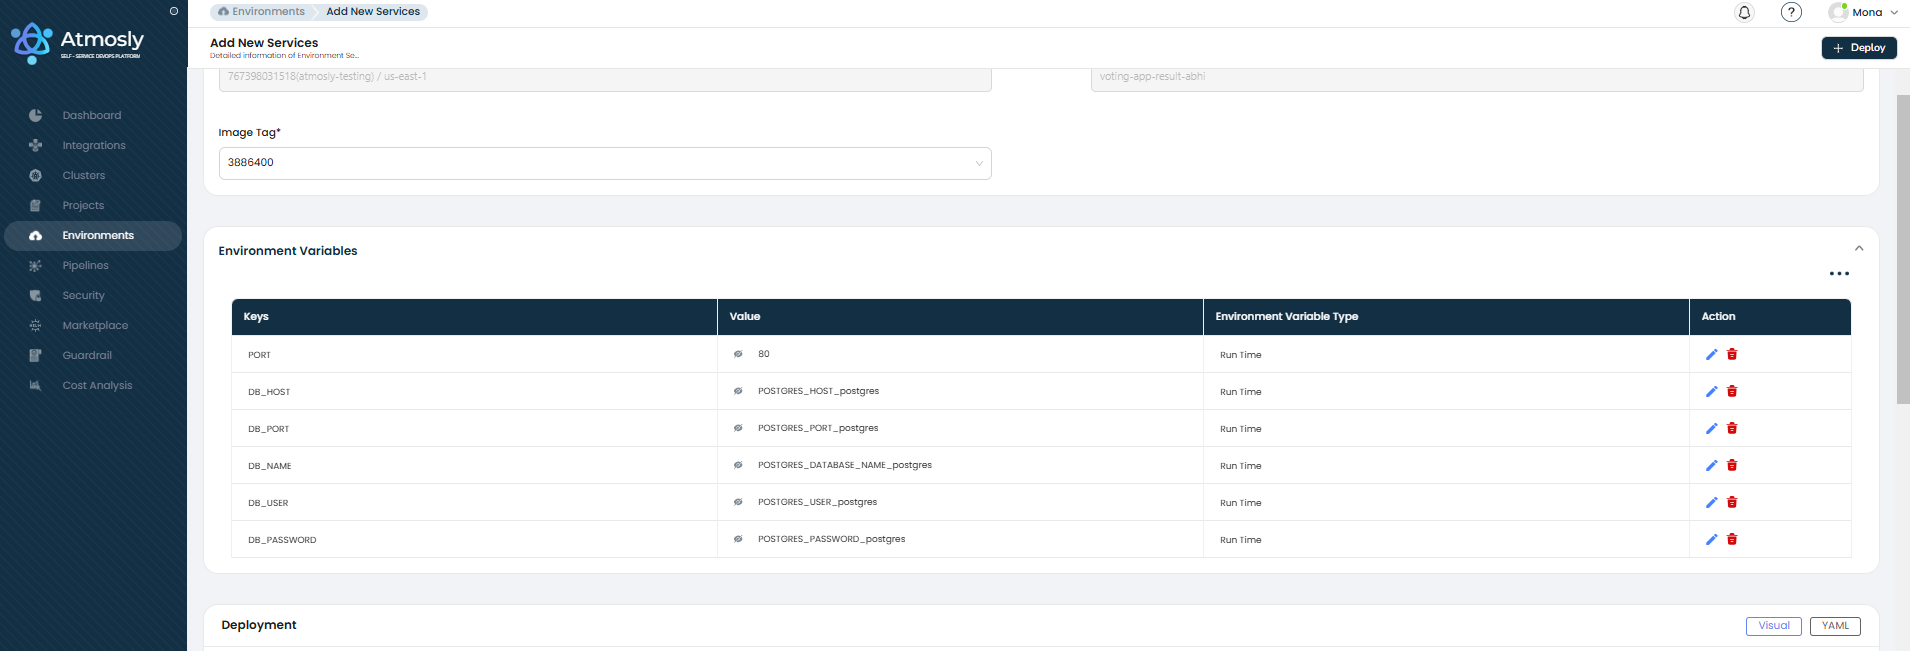
Environment Variables
Add key-value pairs to configure your application at runtime.
| Feature | Description |
|---|---|
| Key / Value pairs | Define environment variable names and their values. |
| Secret variables | Mark sensitive values as secrets — they will be masked in the UI unless you have the View secret permission. |
| Build-time variables | Variables injected during the Docker image build (CI stage). Enable the Build Time flag per variable. |
| Runtime variables | Variables injected when the container starts (CD stage). Enable the Run Time flag per variable. A variable can be both build-time and runtime. |
| Cross-service references | A variable's value can depend on another service's output. Use the Depends On field to reference a datasource or application service — for example, to automatically inject a database connection string. |
| Bulk operations | Select multiple variables for bulk delete. |
| Import / Export | Import variables from another deployment or export current variables as a file. |
Secret Manager Integration
Atmosly supports syncing environment variables with external secret managers. Secret manager integration is configured at the project level and applies to all environments under that project.
Supported providers:
| Provider | Description |
|---|---|
| AWS Secrets Manager | Secrets stored and retrieved from AWS Secrets Manager in the configured region. |
| GCP Secret Manager | Secrets stored and retrieved from Google Cloud Secret Manager in the configured project. |
How it works:
- Connect a secret manager to the project from the Project Settings page by selecting the cloud account and region.
- When creating or updating environment variables, mark sensitive values as Secret.
- Secret variables are automatically synced to the connected secret manager in the cloud.
- When fetching environment variables, secret values are retrieved from the cloud provider in real-time.
- Each variable tracks its sync status (
syncedornot synced) with the secret manager.
Disconnecting a secret manager removes all secret variable references from the cloud provider and converts them back to local storage.
To view secret values in the UI, your role must have the View secret permission. Without it, secret values appear masked as *****.
Disconnecting a secret manager from a project affects all environments under that project. Secret variables will no longer be synced to or fetched from the cloud provider.
Deployment Configuration
Applications can be deployed using two methods:
- Visual — Configure deployment settings through the Atmosly UI form.
- YAML — Provide a raw Kubernetes YAML manifest for advanced configurations.
YAML Deployment Types
When using YAML mode, select the workload type:
| Type | Description |
|---|---|
| Deployment | Standard Kubernetes Deployment for stateless applications. |
| Job & CronJob | One-time or scheduled batch workloads. |
| StatefulSet | For stateful applications that require persistent storage and stable network identities. |
.png)
.png)
Use the Validate K8s YAML button to perform a Kubernetes dry-run validation — it checks for syntax errors and resource conflicts before deploying.
YAML Special Variables
When using YAML deployment mode, the following variables are automatically available and injected by Atmosly:
| Variable | Description |
|---|---|
$CI_SERVICE_IMAGE | The container image built and pushed by the CI pipeline. Use this to reference the latest image in your YAML. |
$CI_SERVICE_NAMESPACE | The Kubernetes namespace of the current environment. |
env[] | The environment variables array configured for the service — automatically injected into the pod spec. |
Import Environment Variables from Repository
You can import environment variables directly from .env files stored in your Git repository:
- In the Environment Variables section, click Import.
- Select the repository and branch.
- Atmosly will list the available
.envfiles in the repository. - Select a file to import its key-value pairs into the environment variables form.
This is useful for bootstrapping environment variables from your existing project configuration.
Networking & Ingress
| Field | Description |
|---|---|
| Service Port | The port your application listens on (0–65535). |
| Service Type | ClusterIP (internal only), NodePort, or LoadBalancer. |
| Endpoint Type | Public (internet-accessible) or Private (internal network only). |
| Health Check Path | HTTP endpoint for liveness and readiness probes (e.g., /health). |
| Ingress | Enable to expose the service via an ingress controller (NGINX or ALB). |
| Path | The URL path for routing traffic to this service (e.g., /). |
Custom Domain
Enable a custom domain for your service:
| Field | Description |
|---|---|
| Custom Domain | Toggle to enable custom domain configuration. |
| Domain URL | The custom domain name (e.g., api.example.com). |
| DNS Zone | Select the hosted zone (Route53 or Cloudflare). |
| HTTPS | Enable HTTPS with automatic TLS certificate provisioning. |

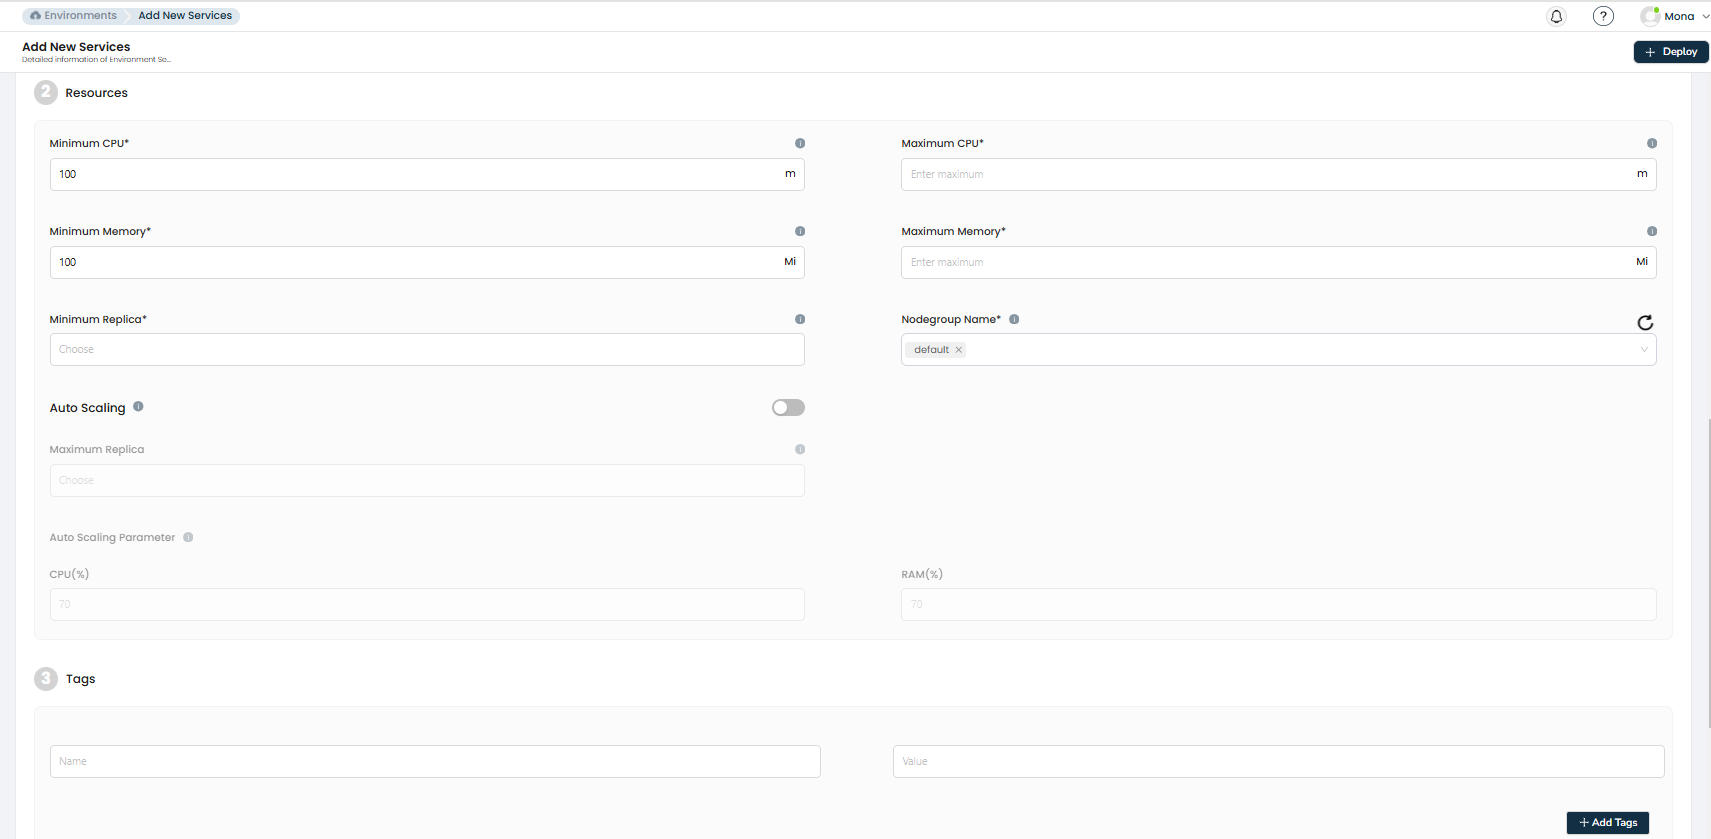
Resource Limits
| Field | Description |
|---|---|
| CPU Request | Minimum CPU allocated to the service (in millicores, minimum 100m). |
| CPU Limit | Maximum CPU the service can use (must be greater than or equal to the request). |
| Memory Request | Minimum memory allocated (in Mi, minimum 100Mi). |
| Memory Limit | Maximum memory the service can use (must be greater than or equal to the request). |
| Nodegroup | The node group where the service pods should be scheduled. |
Horizontal Pod Autoscaler (HPA)
Enable auto-scaling to dynamically adjust the number of pods based on resource usage.
| Field | Description |
|---|---|
| Enable Autoscaling | Toggle to enable HPA. |
| Minimum Replicas | The minimum number of pods to maintain. |
| Maximum Replicas | The maximum number of pods to scale out to. |
| CPU Threshold | Target CPU utilization percentage (1–100%) that triggers scaling. |
| Memory Threshold | Target memory utilization percentage (1–100%) that triggers scaling. |
Persistent Storage & Volumes
| Field | Description |
|---|---|
| Storage Volume | Create a persistent volume with configurable size (minimum 5 Gi), mount path, and storage class. |
| ConfigMaps | Mount configuration files into the container. Specify name, mount path, filename, and file content. |
| Secrets (Files) | Mount secret files into the container. Same structure as ConfigMaps but stored as Kubernetes Secrets. |
Task Schedulers
| Field | Description |
|---|---|
| Cron Jobs | Enable scheduled tasks with a custom entry point command. |
| Queue Workers | Enable background queue processing with a custom entry point command. |
Labels
Add custom key-value labels to your service for Kubernetes-level categorization and policy matching.
Step 3 — Datasource Configuration
If your project includes datasources (databases), configure them during environment creation.
Datasource Types
| Category | Supported Databases |
|---|---|
| Self-Managed | MySQL, PostgreSQL, MongoDB, Redis, Kafka |
| AWS Managed | RDS MySQL, RDS PostgreSQL, Aurora MySQL, Aurora PostgreSQL, ElastiCache Redis |
| GCP Managed | Cloud SQL and other GCP database services |
| Azure Managed | Azure database services |
Self-managed databases are deployed as containers within the Kubernetes cluster. Cloud-managed databases are provisioned through the respective cloud provider's API.
Common Datasource Fields
| Field | Description |
|---|---|
| Display Name | A human-readable name for the datasource. |
| Type | Self-Managed or Cloud-Managed (AWS/GCP/Azure). |
| Database Engine | The database software (MySQL, PostgreSQL, MongoDB, Redis, Kafka, etc.). |
| Version | The database version to deploy. |
| Storage Size | Allocated storage capacity (minimum 5 Gi). |
| Replicas | Number of replica instances for high availability. |
| User Access Details | Database username and credentials. |
| Auto-Generated Password | Toggle to automatically generate a secure password. |
| Nodegroup | The node group for scheduling database pods (self-managed only). |
Cloud-Managed Database Fields
| Field | Description |
|---|---|
| DB Type | Single instance or Multi-AZ for high availability. |
| Storage Type | SSD or HDD storage tier. |
| Backup Details | Backup frequency, retention period, and storage location. |
| Maintenance Window | Scheduled time frame for automated maintenance. |
Database Dump Support
For MySQL, PostgreSQL, and MongoDB datasources, you can import an initial data dump during creation:
| Database | Supported Formats |
|---|---|
| MySQL / PostgreSQL | .sql files (from S3 or direct upload) |
| MongoDB | .gzip or .gz archive files |
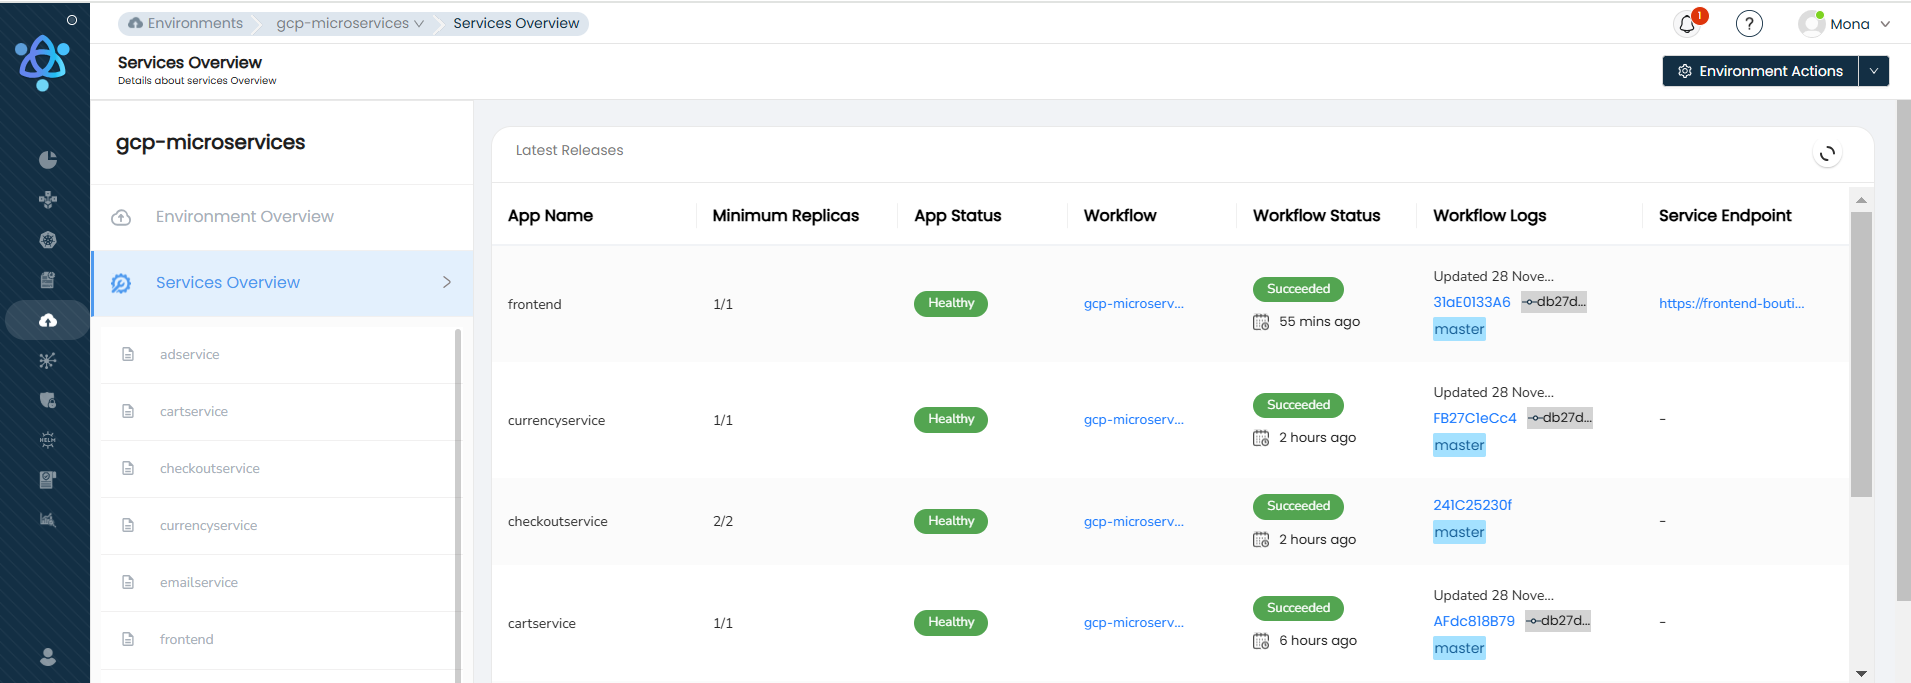
After Creation
Once created, you will be taken to the Environment Overview where you can monitor the status of all deployments.
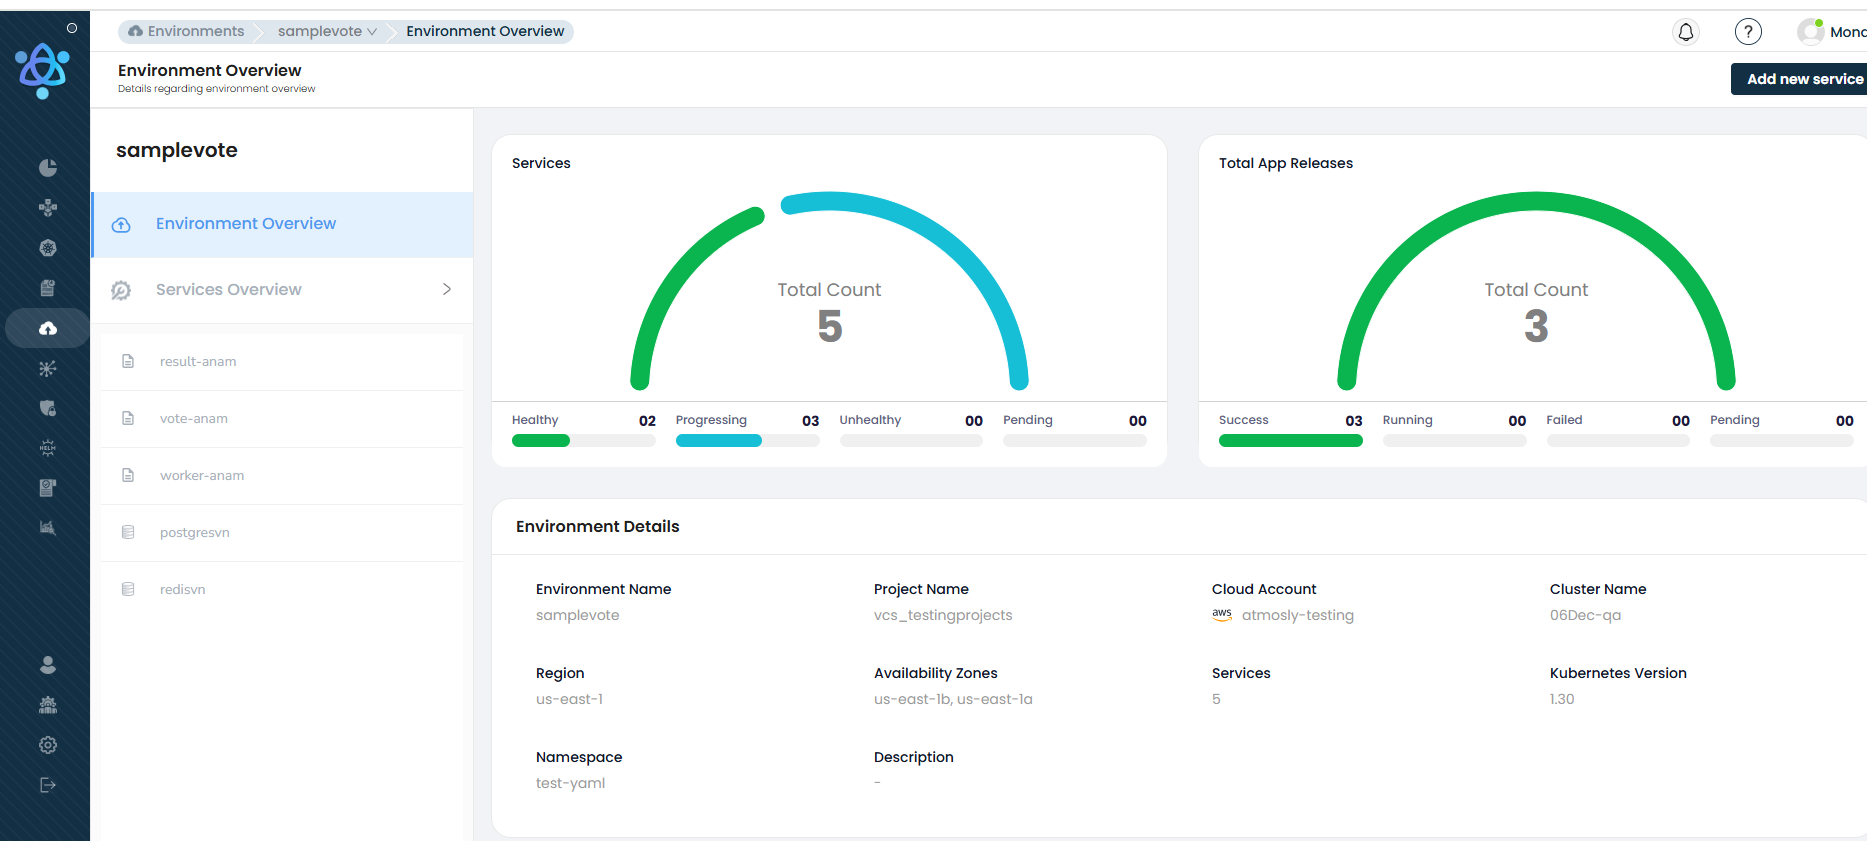
The Services Overview page shows the latest pipeline status for each service. Click on a pipeline to view its CI/CD logs.
To view all pipelines for a service, navigate to the service under Service Overview and select the Pipelines tab.